In today’s competitive real estate market, listing photography isn’t just optional anymore!
High-quality images draw your buyers in, showcasing the property’s best features and making your listings stand out. With buyers scrolling quickly, knowing how to take real estate pictures could be your secret weapon.
It’s not just about a good camera. Balanced composition, lighting, close-ups, and strategic staging are the keys to tell a story and capture buyers’ imaginations.
From prep work to editing, this blog will guide you through each step of taking stunning real estate photos.
1. Get Yourself Ready for the Shoot
Preparation is key.
Proper planning allows you to shoot smoothly and showcase a property’s full potential.
Conduct a detailed walk-through of the property to get familiar with the space. Note the architectural details, unique design elements, or stunning views to identify its standout features.
2. Create a Shot List
Preparing a shot list is essential for just any photography session.
You may see it as an extra step, but having a clear plan means no critical shots are missed.
Identify the must-have images that highlight the property’s key selling points and unique features. Prioritize these so that even if you’re pressed for time, you’ll still have captured the shots that best showcase the home’s appeal.
For instance, begin with the exterior in natural sunlight, move through the interior methodically room by room, and wrap up with additional outdoor shots.
Timing plays a critical role. The golden hour offers an unbeatable opportunity to capture soft, dramatic lighting, so it’s wise to photograph the exterior twice—once when you first arrive and again at the end of your session.
Sample Real Estate Shot List
Exterior (Full Sunlight):
- Front of the home: Head-on shot and from each side angle
- Backyard: One to three shots – capture the view from the home and vice versa, along with close-ups of unique features or landscape
Exterior (Dusk):
- Front of the home: One head-on and one from each angle (right and left)
Interior: For each of the main rooms, take three angles and focus on detailed vignettes:
- Living room
- Kitchen
- Primary bedroom and bathroom
- Guest bedrooms and bathrooms
- Home office
- Finished basement
Additional Features:
- One shot for each special amenities, like a fireplace, home office, or walk-in closet
Pro Tip: For dusk shots, turn on the interior lights to create a warm, inviting glow.
3. Get Essential Gears
Ensuring your equipment is ready to go is one of the most important steps in real estate photography.
A few simple checks can make all the difference in the quality and efficiency of your shoot.
- Charge and check your camera or smartphone
- Clean dust and smudges on lenses
- Pack Backup Equipment
- Additional accessories
- Optimize settings, use a low ISO to minimize noise and ensure crisp, clear images
- Get professional-grade camera
- Keep interchangeable lenses
- Tripod
- Drones
4. Strike the Right Height Balance
The height from which you shoot can make or break a photo. Too low, and your images may focus too much on furniture or flooring. Too high, and they may highlight ceilings unnecessarily.
Aim for a natural height that aligns with the space. Keep vertical lines like walls and cabinet edges straight, which will result in clean and professional-looking photos.
It’s best to shoot at a height between chest and eye level.
5. Make Sure the Lighting Is Right
Proper lighting is the key for good photos.
Open the curtains and blinds to let sunlight flood the space with natural light. You will get a realistic and balanced ambiance.
Obviously, avoid shooting on cloudy days or during harsh lighting conditions.
You can supplement natural light with softboxes, reflectors, or flash units to eliminate shadows.
6. Check the Weather
Weather plays a vital role in photography.
An overcast or rainy day can make the photos look dull, uninviting. A bright, sunny day gives off a more vibrant appearance.
Weather change is not your hand. So always have a back up plan for unexpected changes in weather.
Bonus Tip: Take Advantage of Golden Hours
Photograph properties early in the morning or late in the afternoon to create soft shadows and warm tones. These natural lighting conditions enhance the property’s appearance.
7. Clean and Declutter
A clean, clutter-free property is ideal for standout photos. Clutter distracts your buyers from the home’s best features.
Clean the space thoroughly. Focus on dusting, vacuuming, and organizing.
Pay attention to windows as well. A smudge-free glass allows natural light to shine through.
Remove unnecessary items like personal belongings, extra chairs, or shoes.
Keep outdoor areas, such as the yard, porch, and patio, tidy.
Here is a handy decluttering checklist:
- General Preparation
- Clean windows and mirrors; remove screens
- Ensure all lightbulbs are working
- Living Room
- Remove family photos, toys, and visible cords
- Clear non-decorative items from tables
- Kitchen
- Declutter countertops and remove magnets, calendars, and garbage cans
- Put food away and wash dishes
- Bathrooms
- Clear sinks and shelves of clutter
- Hide laundry baskets and ensure surfaces sparkle
- Bedrooms
- Make all beds and put away clothes and shoes
- Stage with neutral decor
- Dining Room
- Clear mail, papers, and clutter from the table
- Front & Backyard
- Sweep walkways and patios; rake leaves if needed
- Skim pools, tidy flower beds, and trim lawns
- Remove cars from the driveway
- Finished Garages or Basements
- Organize shelves and remove unused items or boxes
8. Set the Scene with Effective Staging
Once the property is clean and clutter-free, it’s time to stage it to showcase the best features.
Even furnished homes may need adjustments to look their best on camera. For empty spaces, consider hiring a professional stager if the budget allows.
If you’re working with a smaller budget, virtual staging is a cost-effective alternative.
Virtual tours and staged photos can elevate your listing. Just ensure these images are properly labeled to comply with MLS guidelines.
Virtual staging tools like Apply Design are good for quick, realistic results.
9. Position in a Room Angle or Doorway
For smaller spaces, positioning is crucial to accurately convey the room’s size.
Standing in a corner or doorway can create depth, showcase the full space, and capture the entire room in one shot. Aim for chest-level positioning to avoid distortion and ensure a natural perspective.
Taking multiple shots helps you have plenty of options to choose from during editing. Pay attention to composition, framing, and lighting.
Popular shot types:
- Corner shots: Position yourself at a 45-degree angle with windows to the side, shooting corner to corner to make the room look spacious. Include three walls when possible.
- Straight-On shots: Ideal for showcasing kitchens, bathrooms, windows, and stairways, as they complement the symmetry in home architecture.
Bonus Tip: Capture Detail Shots
Detailed, close-up shots are excellent for highlighting unique features, such as a fireplace’s stonework or a kitchen’s marble countertops. These close-ups provide additional information that wide shots can’t capture.
10. Take Advantage of Reflections
Reflections add a creative touch to photos.
Use mirrors, windows, or other reflective surfaces to highlight the property’s best features.
If you have time, feel free to experiment with angles for the best appealing reflections. Just make sure to avoid unwanted reflections like yourself.
11. Use a Flash
If lighting conditions are poor, get a camera flash. Flashes greatly improve photos by illuminating dark areas and balancing exposure.
For best results, diffuse or bounce the flash off surfaces to avoid harsh lighting.
Adjust the flash intensity as needed to achieve a natural and evenly lit scene.
12. Showcase Curb Appeal
Capture the property’s exterior to show its curb appeal. Give your potential buyers a view of the property’s surroundings from different angles.
Get some close-up shots of unique elements like a front porch or an inviting entrance.
13. Capture The Property’s Unique Selling Points
- Highlight the property’s architectural features
- Showcase luxurious amenities like a swimming pool or spa
- Emphasize the spaciousness and functionality of each room
- Highlight other unique or standout elements, such as a fireplace or custom-built features
If your listing is on a website like Zillow, these standout features are often evident and included as keywords.
14. Highlight Neighborhood
This is one of the most overlooked tips, but it shouldn’t be.
Besides showcasing the property, you’re selling a way of life and a neighborhood. By taking photos of the community and surrounding areas, you can create a sense of place and highlight what makes the area unique.
15. Use Professional Photo Editing Software
The real magic happens during the editing process. Professional photo editing softwares can give your real estate photos a polished and appealing look.
Adjust white balance, lighting, cropping, and straighten images to ensure a clean, professional finish.
For advanced results, consider incorporating HDR (High Dynamic Range) photography. HDR combines multiple exposures (light, normal, and dark) into one dynamic image:
Some highly recommended editing softwares are:
- Aurora HDR
- Adobe Lightroom
- Adobe Photoshop
- Adobe Lightroom
- Photomatix Pro
- DxO PhotoLab
- Luminar AI
- PTGui
- Canva
- PicMonkey
- Skylum AirMagic
Post-production tools and techniques set your listings apart, making every photo market-ready.
For next-level impact, consider incorporating AR (Augmented Reality) and VR (Virtual Reality) tools into your photography. These technologies are becoming increasingly accessible and can dramatically elevate your listings.
Common Post-Production Mistakes to Avoid
- Over-editing or oversaturation
- Inconsistent white balance or editing styles
- Misrepresentation of the property
- Removing all shadows (they add depth)
- Excessive HDR or lens distortion
- Using low-quality images as a starting point
- Failing to back up original photos
16. Adjust Color Temperature, Luminosity, and Contrast
Fine-tuning color temperature, luminosity, and contrast can elevate photos to a professional level:
- Color Temperature: Create a warm, inviting atmosphere by adjusting the white balance and remove overly cool (greenish) or overly warm (reddish) tones
- Luminosity: Balance exposure so all areas of the photo are visible without overexposure or dark shadows
- Contrast: Enhance visual appeal by highlighting details and creating depth in images
17. Apply Photo Filters
Photo filters can enhance your real estate photos by creating specific styles or moods.
Add a sunset filter or a warm tone for a cozy atmosphere.
However, it’s best to avoid overusing filters, as overly edited images may appear unnatural or misleading.
18. Edit Out Unnecessary Objects
If unwanted objects or personal items appear in your photos, use editing software to remove them. Keep the focus on showcasing the property as it truly is.
19. Create Marketing Materials with Photos
Once your photos are edited, use them to build cohesive marketing materials for both online and print campaigns.
Platforms like Canva and Freepik offer templates for brochures, social media posts, door hangers, and postcards.
20. Use a Virtual Staging Service
Virtual staging can transform empty rooms into inviting spaces.
Add AI-generated furnitures and decors so buyers can better envision the property’s potential. It’s a cost-effective alternative to physical staging, saving both time and money.
Top Virtual Staging Tools:
- iStaging
- Square Foot Productions
- Matterport
21. Create a 3D Tour
3D tours are a powerful way to make your listings stand out and attract more interest.
It gives potential buyers a deeper understanding of the property.
Applications like Zillow 3D Home® Tours make it easy to create virtual tours using just your smartphone.
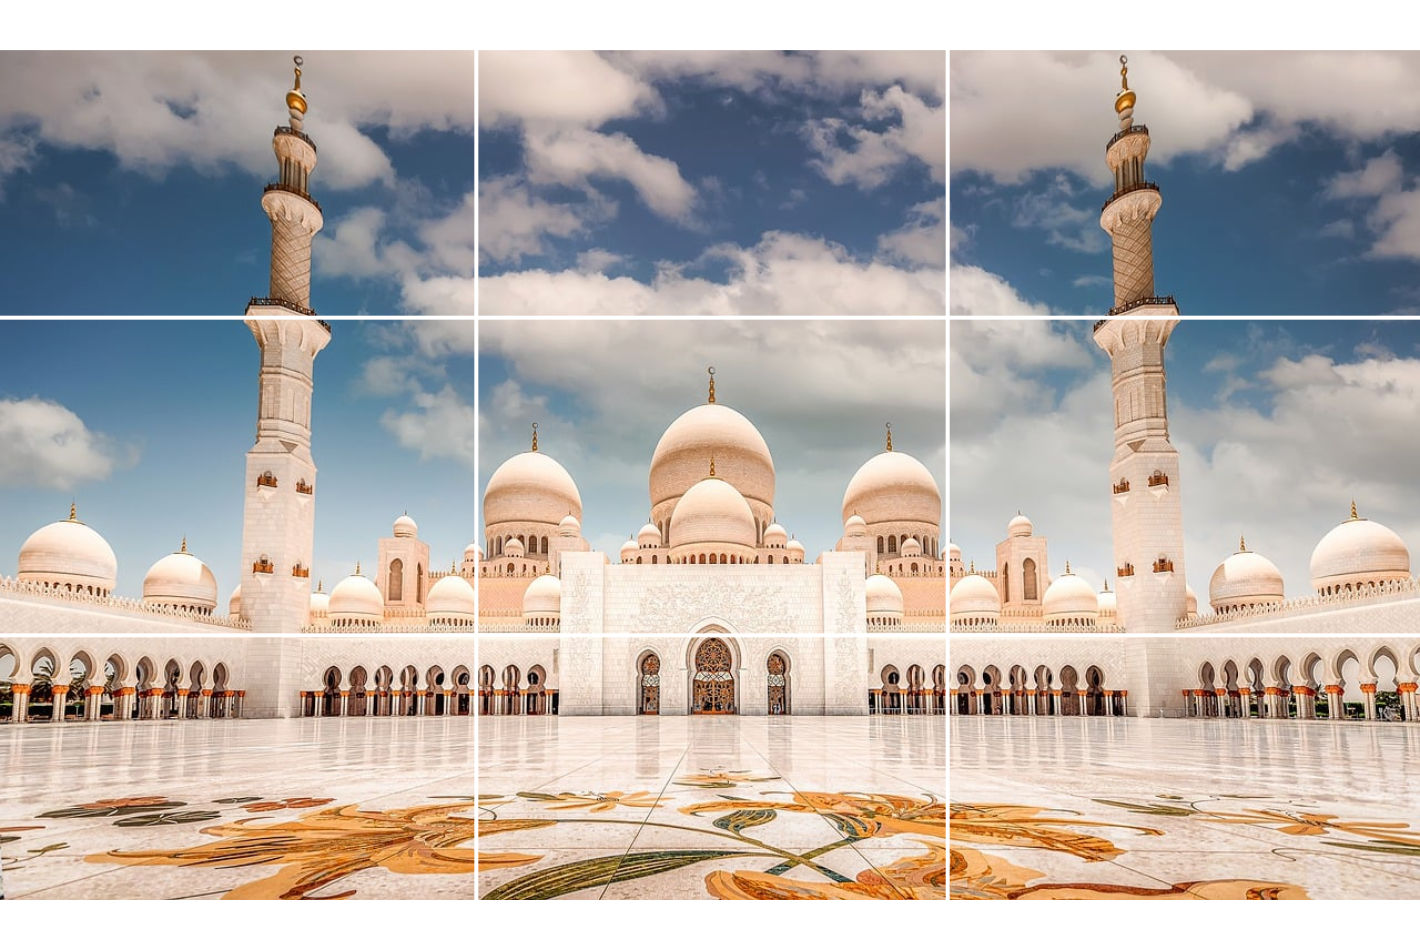
22. Follow the Rule of Three
The rule of three guides viewers’ eyes to the photo’s subject, such as a custom fireplace or a stunning backyard. Position the subject at one of the grid’s four intersections to emphasize the target area.
This classic composition technique helps create engaging and professional real estate photos.
Samples:


A Room-by-Room Checklist to Real Estate Photography
- Entrance and Exterior
- Take wide shots to showcase architecture and landscape features
- Living Room
- Highlight fireplaces, columns, or views
- Use wide-angle shots to show dimensions
- Kitchen
- Emphasize high-end appliances, materials, and storage
- Capture close-ups of designer fixtures included in the sale
- Dining Room
- Use wide shots for space; close-ups for chandeliers or built-ins
- Stage for entertaining with an elegant table setting
- Bedrooms
- Capture the room’s full size from a corner
- Highlight walk-in closets or en-suite bathrooms
- Bathrooms
- Ensure fixtures are gleaming and surfaces spotless
- Highlight luxury features like spa tubs, rain showers, or marble tiles
- Home Office
- Show built-in shelving or neat workspaces
- Stage flex spaces for alternative uses like a playroom, library, or bar
- Gym/Spa/Pool
- Highlight professional equipment, spa features, or unique pool designs
- Stage with yoga mats or towels for added appeal
- Outdoor Spaces
- Showcase patios, gardens, and balconies with wide shots
- Emphasize luxury features like outdoor bars, fire pits, or water features
- Shoot during the golden hours for best lighting
Should You Hire a Professional Photographer?
A professional photographer is the best choice if your budget allows. Real estate photography is a specialized skill and a pro ensures high-quality results.
If you choose to do DIY, make sure your skills and results measure up. Poor-quality photos may leave a bad impression, and you’ve likely seen listings with photos that left a bad impression. Avoid becoming one of those.
The Impact of Real Estate Photography on Listings
- High-quality photography can make or break a property’s initial impression
- Quality photos create an emotional pull that draws buyers in, increasing chances of quicker sale and higher selling price
- Low-quality images leaves buyers unimpressed, hurting your lead generation pipeline
- Professional photography helps your listings stand out in the competitive market
- Great photos help buyers imagine living in the property
Best Cameras for Real Estate Photography
The right equipment makes all the difference. Here are top recommendations:
Best Phone Cameras
- iPhone 15 Pro Max
- Samsung Galaxy S24 Ultra
- Google Pixel 8 Pro
Best DSLR Cameras
- Canon EOS Rebel SL3
- Nikon D850
- Canon EOS Rebel T8i
- Nikon D5600
- Pentax K-70
Best Mirrorless Cameras
- Sony Alpha A6100
- Sony Alpha A7 III
- Nikon Z5
- Nikon Z6 II
- Nikon Z7 II
- Canon EOS RP
- Canon EOS R7
- Canon EOS R
- Canon EOS R5
- Canon EOS R6
- Sony A7R II
- Sony A7R III
- Sony A7R IV
What to Consider When Choosing a Camera Lens?
Selecting the right lens is essential for capturing professional real estate photos. Here are key factors to keep in mind:
- Native lenses (same brand as your camera) are high-quality but often more expensive. Third-party lenses can be good alternatives at lower prices.
- Make sure the lens is compatible with your camera’s mount, different brands and models have specific interfaces.
- Zoom lenses are versatile and allow you to adjust focal lengths without needing multiple lenses. This flexibility makes them an excellent choice for real estate.
- A wider aperture (lower f-number) gives better low-light performance and background blur. For real estate photos, an aperture of f4–f11 is ideal for sharp, detailed images.
- Built-in stabilization reduces camera shake
Top Drone Models for Real Estate Photography
- DJI Mini 4 Pro
- 1/3-inch CMOS sensor
- 24MP photos and 4K/60fps videos
- Autel Evo II Pro
- 6K camera
- 40-minute flight time
- DJI Air 2S
- 20MP photos and 5.4K videos
- Budget-friendly and portable
- DJI Air 3
- Compact, foldable design
- Easy to use and affordable
- DJI Mavic 3 Pro
- 24-200mm optical zoom
- Perfect for detailed and wide-angle shots
- Autel Robotics EVO Lite+
- 1-inch CMOS sensor
- 20MP photos and 6K videos
- DJI Mini 3 Pro
- Budget-friendly option with essential features